HOW TO SET UP?
The system must recognize your Hercules DJ Console MK2 as Audio and HID device before configuring in DJ ProMixer.
Hercules DJ Console MK2 only requires download and install Hercules ASIO Driver, once installed you can configure it in DJ ProMixer.
CONFIGURATION
Hercules DJ Console MK2 has two different set up (for Internal or External Mode):
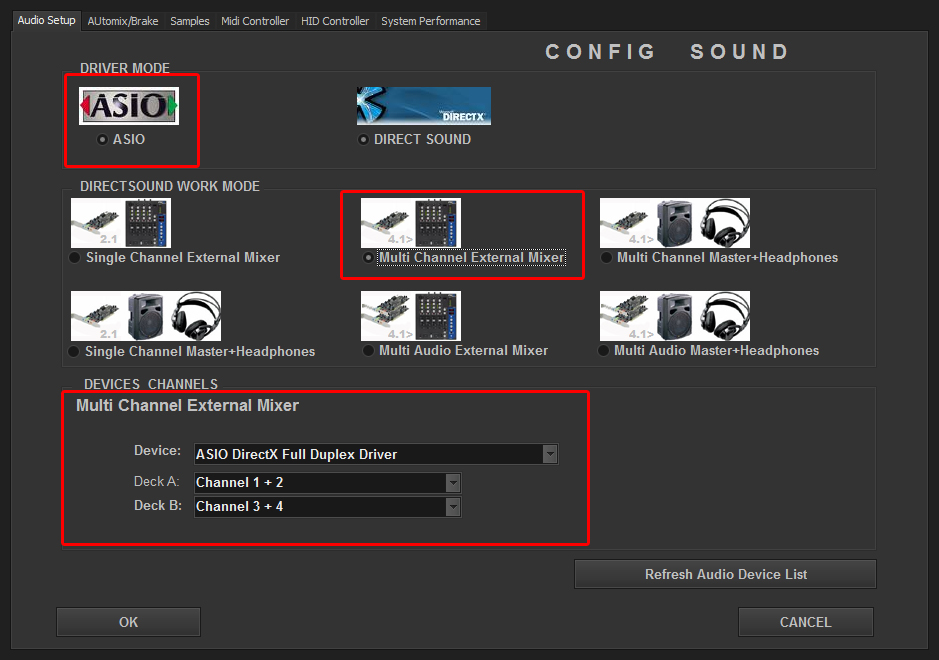
Open DJ ProMixer and go to “Config” and open “Audio Setup”, here you can select your Hercules DJ Console MK2 as Audio Sound Card.
AUDIO SETTINGS
INTERNAL MODE (Master + Headphones)
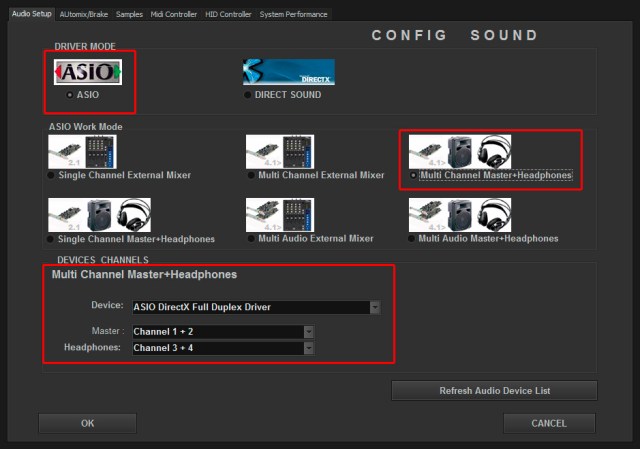

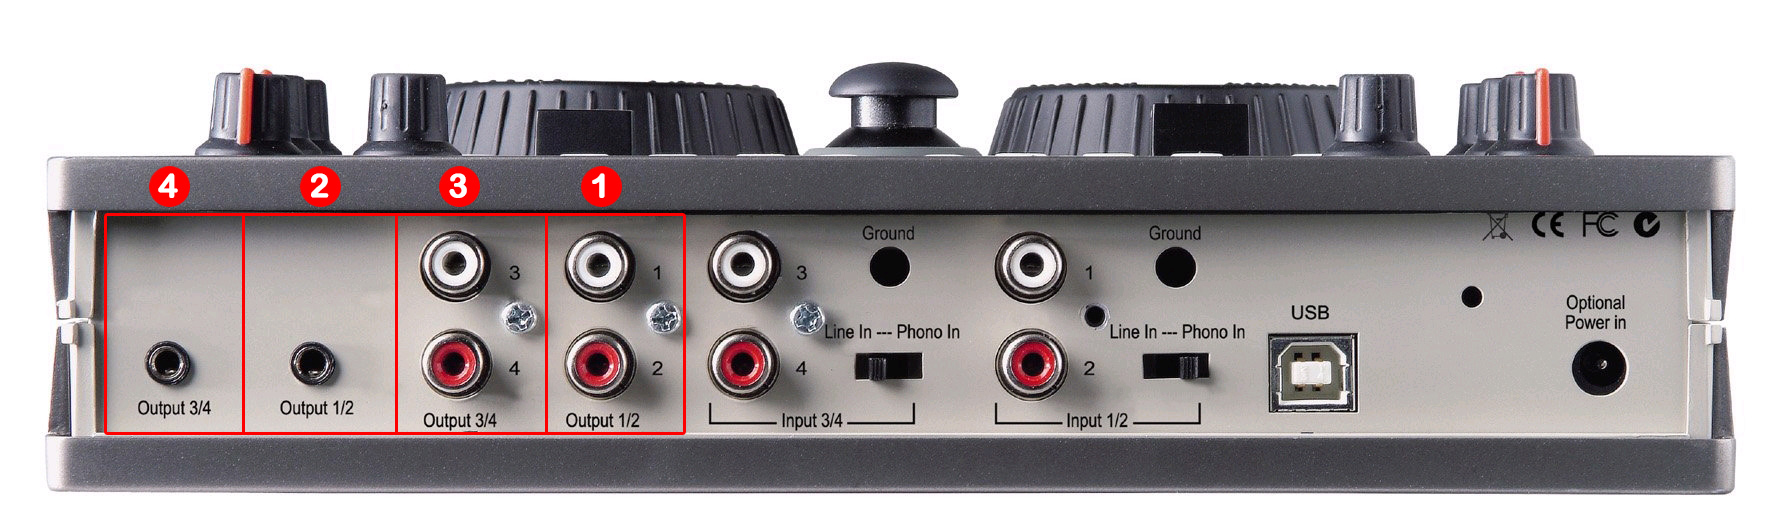
For Internal Mode choose your output: 1.- RCA or 2.- 1/8 TSR connector.
Connect your headphones in front ( ¼ TSR stereo connector).
EXTERNAL MODE (Deck A + Deck B connected to external mixer)


For External Mode choose your outputs: Deck 1.- (1) RCA or (2) 1/8 TSR connector Deck 2.- (3) RCA or 1/8 TSR connector
Important: Hercules DJ Console MK2 is designed to be used as internal mode (with internal Sound Card using master output & headphones) or external mode (using the internal soundcard for each deck).
HID SET UP
Hercules DJ Console Mk2 has two HID maps:
1.- Normal: Respecting the name of the serigraphy

In “Config” go to “HID Controllers” and then select in HID PORT / HID MAP 1 on the left side one device (HERCULES DJ CONSOLE MK2 MID0) and select on the right side HERCULES DJ CONSOLE MK2 (NORMAL).XML. HID PORT / HID MAP 2: Nothing Selected.
2.- Pitch Inverse: Inverting Pitch / Volume
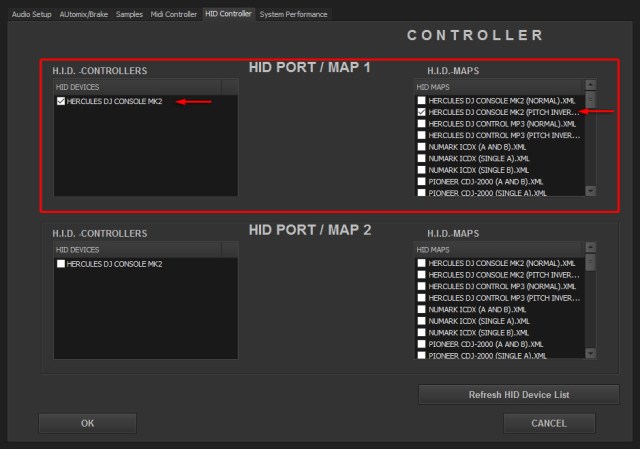
In “Config” go to “HID Controllers” and then select in HID PORT / HID MAP 1 on the left side one device (HERCULES DJ CONSOLE MK2 MID0) and select on the right side HERCULES DJ CONSOLE MK2 (PITCH INVERSE).XML. HID PORT / HID MAP 2: Nothing Selected.
HID MAP

Overview
Detail
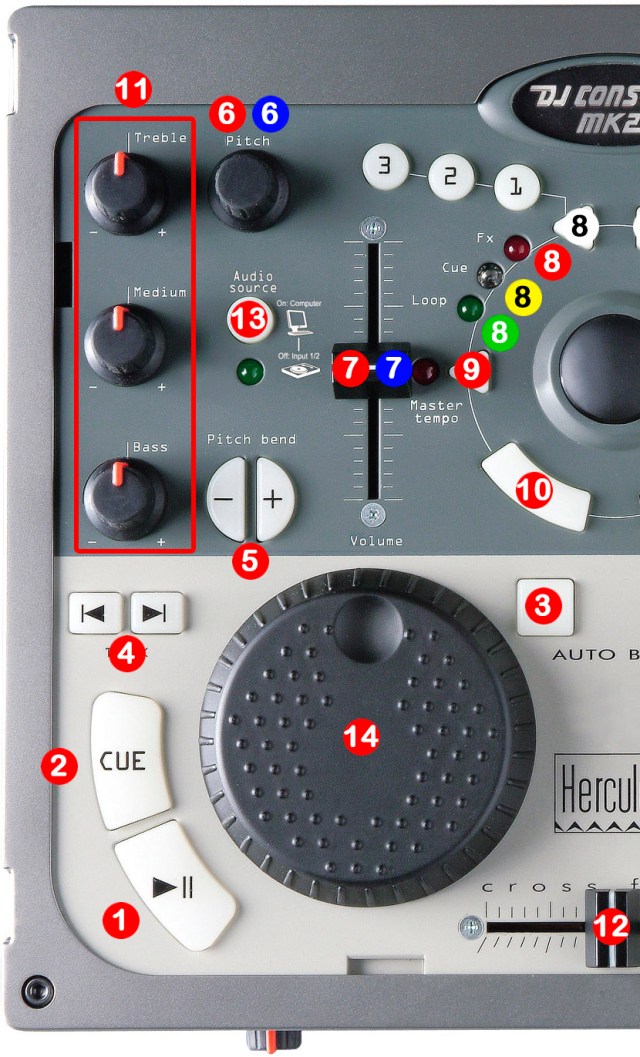
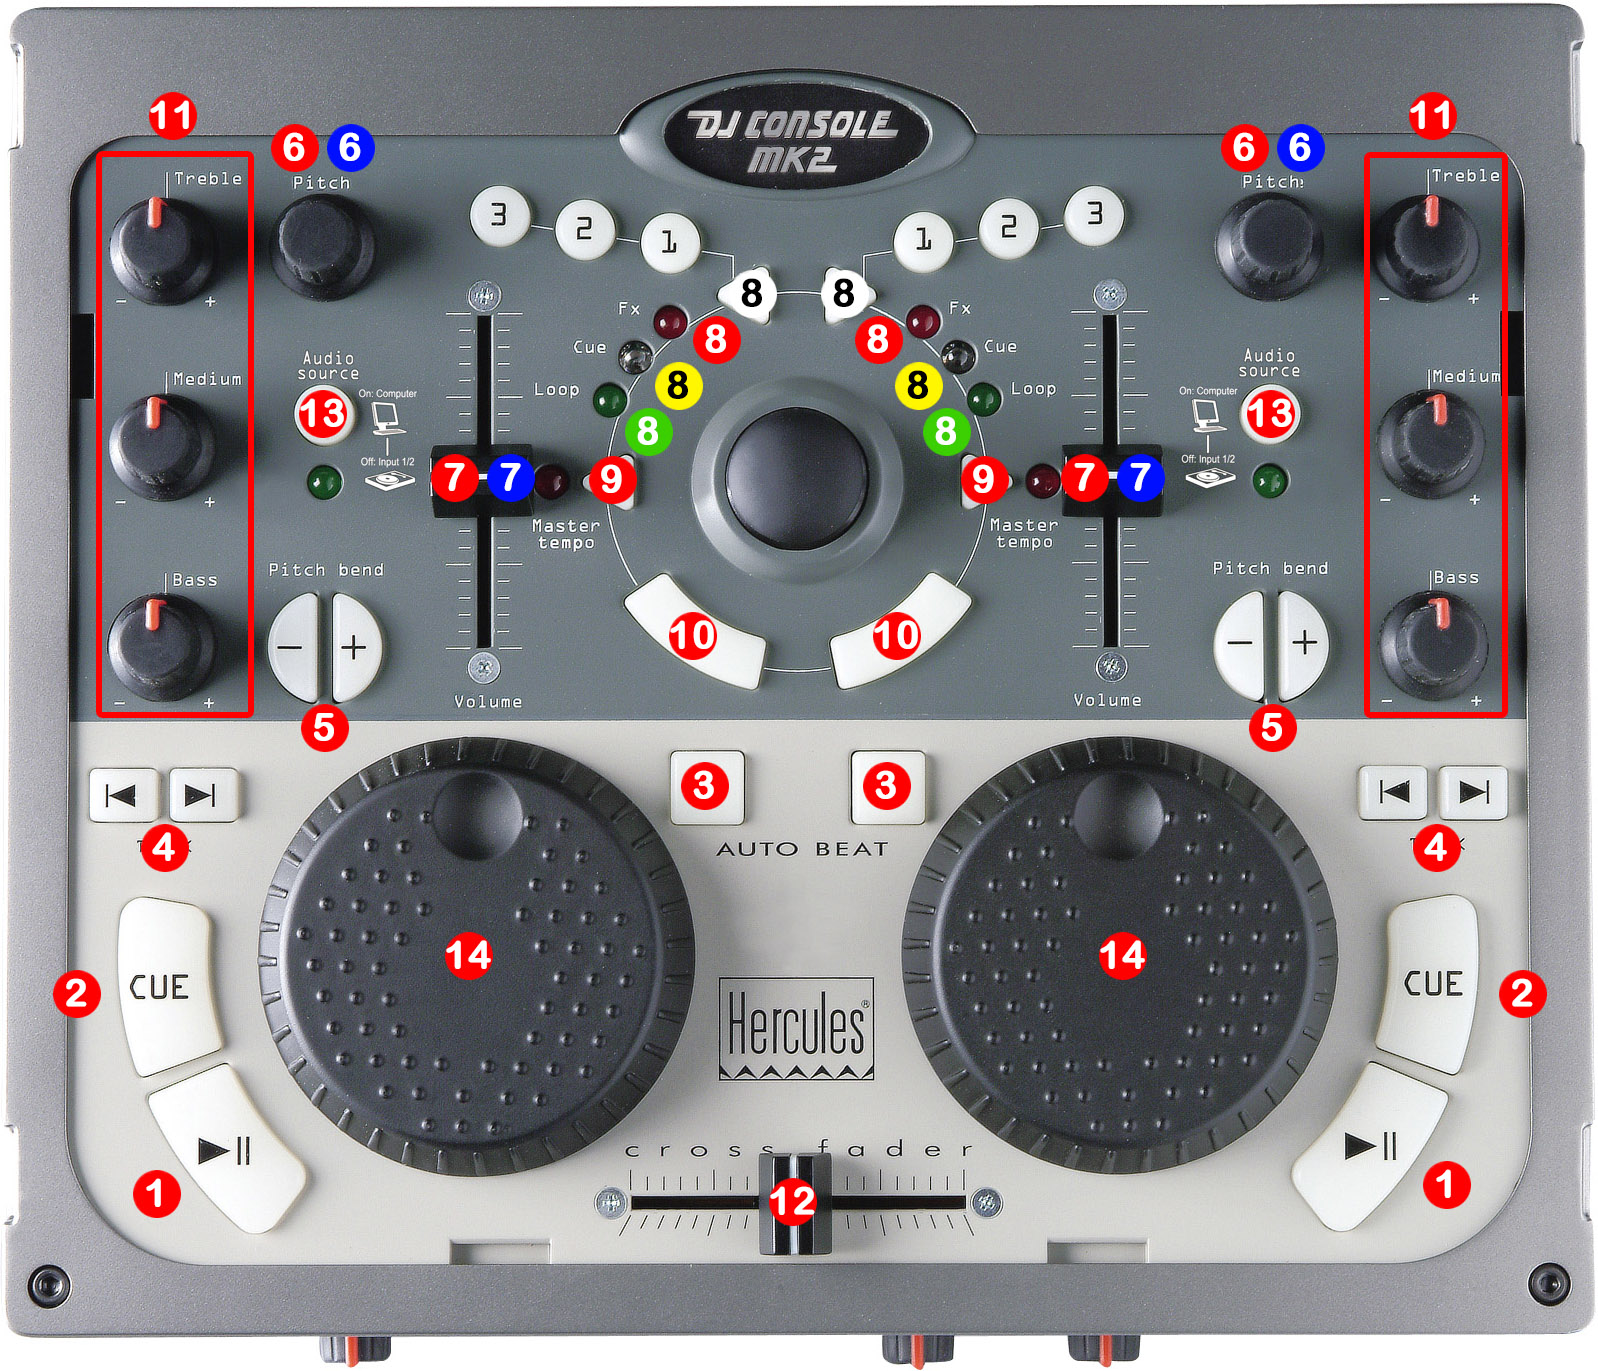
1.- PLAY / PAUSE
2.- CUE
3.- SYNC
4.- MOVE WITH ACTIVE FUNCTION (CUE/LOOP MEMORY OR ACTIVE AUTO LOOP
5.- BEND (BUTTONS)
6.- PITCH (NORMAL MAP)
6.- VOLUMEN (PITCH INVERSE MAP)
7.- VOLUMEN (NORMAL MAP)
7.- PITCH (PITCH INVERSE)
8.- PAD BUTTON SELECTOR: OFF
BUTTON 1 – SAMPLE 1
BUTTON 2 – SAMPLE 2
BUTTON 3 – SAMPLE 3
8.- PAD BUTTON SELECTOR: POSITION “FX” (RED LIGHT)
BUTTON 1 – FX 1 (ECHO)
BUTTON 2 – FX 2 (FLANGER)
BUTTON 3 – FX 3 (WAH)
8.- PAD BUTTON SELECTOR: POSITION “CUE” (YELLOW LIGHT)
BUTTON 1 – CUE / LOOP 1
BUTTON 2 – CUE / LOOP 2
BUTTON 3 – CUE / LOOP 3
8.- PAD BUTTON SELECTOR: POSITION “LOOP” (GREEN LIGHT)
BUTTON 1 – LOOP IN
BUTTON 2 – LOOP OUT
BUTTON 3 – EXIT / RELOOP
9.- KEYLOCK
10.- LOAD DECK
11.- ROTARY KNOBS OF THE MIXER (EQ HI, MID,BASS)
12.- CROSSFADER
13.- SOURCE AUDIO SOUND CARD (DECK A / B)
14.- WHEEL


About DJ ProMixer
"DJ ProMixer The first Professional DJ Software Low Cost & High Quality."
Only One Activation Code for 1,99 € Easy, intuitive and ergonomically designed for Deejays.
DJ ProMixer has been designed and conceived to offer the best professional program for the deejay, with a clear design and an intuitive interface, DJ ProMixer is at the forefront by delivering a professional product at low cost, while maintaining a high quality standard.
Compatible with the latest generation of CD Midi and the most sold MP3 controllers:
Compatible with the Pioneer CDJ 400, Numark ICDX, and Reloop RMP-3 Alpha in single mode (with one CD MIDI can be controlled two Decks) or dual (one CD for each deck).
DJ Promixer offer compatibility with the best and most sold MP3´s controllers in the market:
PIONEER, DENON, NUMARK, RELOOP, BEHRINGER, Hercules, ION, VESTAX ...
Behringer BCD 2000, Behringer BCD 3000, Hercules DJ Control MP3 E2, Hercules DJ Console MK4, Hercules DJ Control MP3, Hercules DJ Console MK2, Hercules DJ Console Steel, Hercules DJ Console Rmx, Ion Discover DJ, Numark Stealth Control, Numark Total Control, Numark Omni Control, Reloop Digital Jockey, Vestax VCI 100...
Three different system performance
Three different forms of system performance to offer the best way to adapt DJ ProMixer to your computer with optimum efficiency. For Fast, Medium and Slow computers also included Netbooks settings.
Sync.System "Ultra Sync"
DJ Promixer incorporates the most advanced system´s of synchronization tracks, which can synchronize to one thousandth of a Beat, so we can mix even the loops with high accuracy which enables us to do live remixes.
Wheel Multifunction
The Wheel of DJ Promixer is the most advanced of the market, attractively designed with VU with a “vintage” look, is a multifunction wheel also controls the bend, scratch, quick search and effects.
Six memory banks CUE / Loop mode selectable Hot / Normal
DJ ProMixer has incorporated a memory bank to allocate six points interchangeably CUE or Loop.
Also starting point Cue or Loop can be done in the normal mode (pause and start) or a hot mode (direct start without pause).
Decks functions: always visible and easily accessible
The ergonomics of DJ Promixer allows direct access and easy access to the functions of the tracks.
Loops in automatic mode and manual mode, adjustable brake (stop like turntable), load and sync are showed prominently in a function block by deck.
Central Panel Multifunction
In the Central Panel ther are alternative functions: Mixer, Sampler and Effects, to not interfere with the view of the List.
Mixer: includes complete kills, EQ, gain, volume and crossfader
Sampler: Six Samplers assignable to each deck´s soundcard, with independent volume.
Effects: Echo, Wha, Flanger, assignable for each deck, auto sync (Echo), controls dry / wet and effect parameter.
Automix: Parameterization of fade in and fade out.
Advanced List
List up to three levels
Depending on the size of the screen can be made up to three levels with Explorer, Playlist and Groups / Subgroups.
User friendly and intuitive, has a very complete and advanced search system in the Playlist and Groups / Subgroups.
More features:
*Complete Mixer with Crossfade between two tracks.
* Automatic beat detection.
*Automix
*Until three simultaneous effects (echo, flanger, wah)
* Automatic synchronization between the decks based on BPM.
* Supports a large number of audio formats: Mp3, Mp2, Mp1, Ogg, Wav., Aiff, Wma, Fla.
* Change the pitch in real time of each track, slow it down or speed it up to manually sync it with the other tracks.
* Add a cue pointer marker at any point in a track to instantly start playing the track from that point in Normal or Hot Mode.
* Real time Equalization on each Deck (track).
*Six Samplers for each deck.
* Complete Audio Setup include ASIO support.
* Simple and intuitive user interface designed for DJ´s.